

When it comes to real-time applications, resilience isn't a nice-to-have, it’s a necessity. In this post, we’ll walk through a live demo designed to stress-test CockroachDB’s ability to detect anomalies in a stream of financial transactions. Along the way, we’ll simulate production traffic, observe latency under load, and scale our detection pipeline on the fly.
Tech Stack
This tutorial will show you how to build a resilient architecture for detecting purchase anomalies in real time, using:
CockroachDB (distributed SQL, changefeeds)
Kafka (streaming backbone)
Kubernetes (GKE) for orchestration
Custom anomaly detection agents
Real-time CDC (change data capture) pipelines
Get the full codebase on GitHub.
You’ll simulate customer behavior, inject anomalies, scale services live, and explore the system’s ability to stay fast, correct, and available at scale.

A customer makes a purchase, which triggers a CDC message on the “purchase” topic.
This is picked up by the anomaly detection agent, which performs a vector query against the purchase table.
If an anomaly is detected, the anomaly detection agent writes a row in the anomaly table.
This triggers a CDC message on the “anomaly” topic, which is picked up by the reasoning agent.
The reasoning agent fetches all of the pertinent data for the anomaly and asks an LLM to create a friendly message to send to the customer.
The contents of this message are written to a “notification” table.
This triggers a CDC message on the “notification” topic.
This message is picked up by the action agent, which logs the message that would be sent to the customer.
Step 1: Environment Setup
Start by setting environment variables for your GKE cluster (the OPENAI_API_KEY and DATABASE_URL environment variables were configured in the .env file for our demo, although you may prefer to define them elsewhere):
source .env
export CLUSTER_REGION="europe-west2"
export CLUSTER_ZONES="europe-west2-a,europe-west2-b,europe-west2-c"
export CLUSTER_NAME="your-cluster-name"
export SERVICE_EMAIL="you@yourdomain.com"
export PROJECT_ID="your-gcp-project"
Step 2: Spin Up a GKE Cluster
Provision a Kubernetes cluster with 1 node per availability zone:
gcloud container clusters create ${CLUSTER_NAME} \
  --cluster-version latest \
  --region ${CLUSTER_REGION} \
  --node-locations ${CLUSTER_ZONES} \
  --num-nodes 1 \
  --machine-type n2-standard-16 \
  --disk-type pd-ssd \
  --disk-size 100
Then point kubectl to your new cluster:
gcloud container clusters get-credentials ${CLUSTER_NAME} \
  --region ${CLUSTER_REGION}
Step 3: Secure Your Secrets
Store the OpenAI API key (used by the reasoning agent) as a Kubernetes secret:
echo -n ${OPENAI_API_KEY} > openai-api-key.txt
kubectl create secret generic openai-secret --from-file=OPENAI_API_KEY=openai-api-key.txt
rm openai-api-key.txt
Step 4: Deploy Core Services
Install Kafka and CockroachDB using the manifests provided in the codebase:
kubectl apply -f infra/kafka.yaml
kubectl apply -f infra/cockroachdb.yaml
Wait for the CockroachDB cluster to be ready and initialize it:
kubectl wait --for=jsonpath='{.status.phase}'=Running pods --all -n crdb --timeout=300s
kubectl exec -it -n crdb cockroachdb-0 -- /cockroach/cockroach init --insecure
Wait for the IP of the load balancer service and create an environment variable once ready:
while true; do
  export CRDB_IP=$(kubectl get service cockroachdb-public -n crdb -o jsonpath='{.status.loadBalancer.ingress[0].ip}')
  if [ -n "$CRDB_IP" ]; then echo "Got CRDB_IP: $CRDB_IP"; break; fi
  sleep 5
done
Step 5: Create Kafka Topics
We’ll pre-create Kafka topics with 10 partitions for parallel processing. The partitions are important, as this is what allows the system to scale. A single partition would only be consumable by a single consumer.
kubectl exec -it kafka-pod -- rpk topic create purchase -p 10 -r 1
kubectl exec -it kafka-pod -- rpk topic create anomaly -p 10 -r 1
kubectl exec -it kafka-pod -- rpk topic create notification -p 10 -r 1
The following command lists all of the topics configured and the number of partitions and replicas for each:

Step 6: Load Schema and Seed Data
Apply the database schema and load purchase history. We’re using a little tool called dgs in this example but any tool will suffice:
cockroach sql --host ${CRDB_IP} --insecure -f data/create.sql
dgs gen data \
  --config app/cmd/workload/dgs.yaml \
  --url "postgres://root@${CRDB_IP}:26257?sslmode=disable" \
  --workers 4 \
  --batch 100
Create a user and insert 1,000 purchases for them. These will simulate their typical purchasing habits:
cockroach sql --host ${CRDB_IP} --insecure -f data/user.sqlSet up the changefeeds that will wire up the database to all of the agents:
cockroach sql --host ${CRDB_IP} --insecure -f data/changefeeds.sql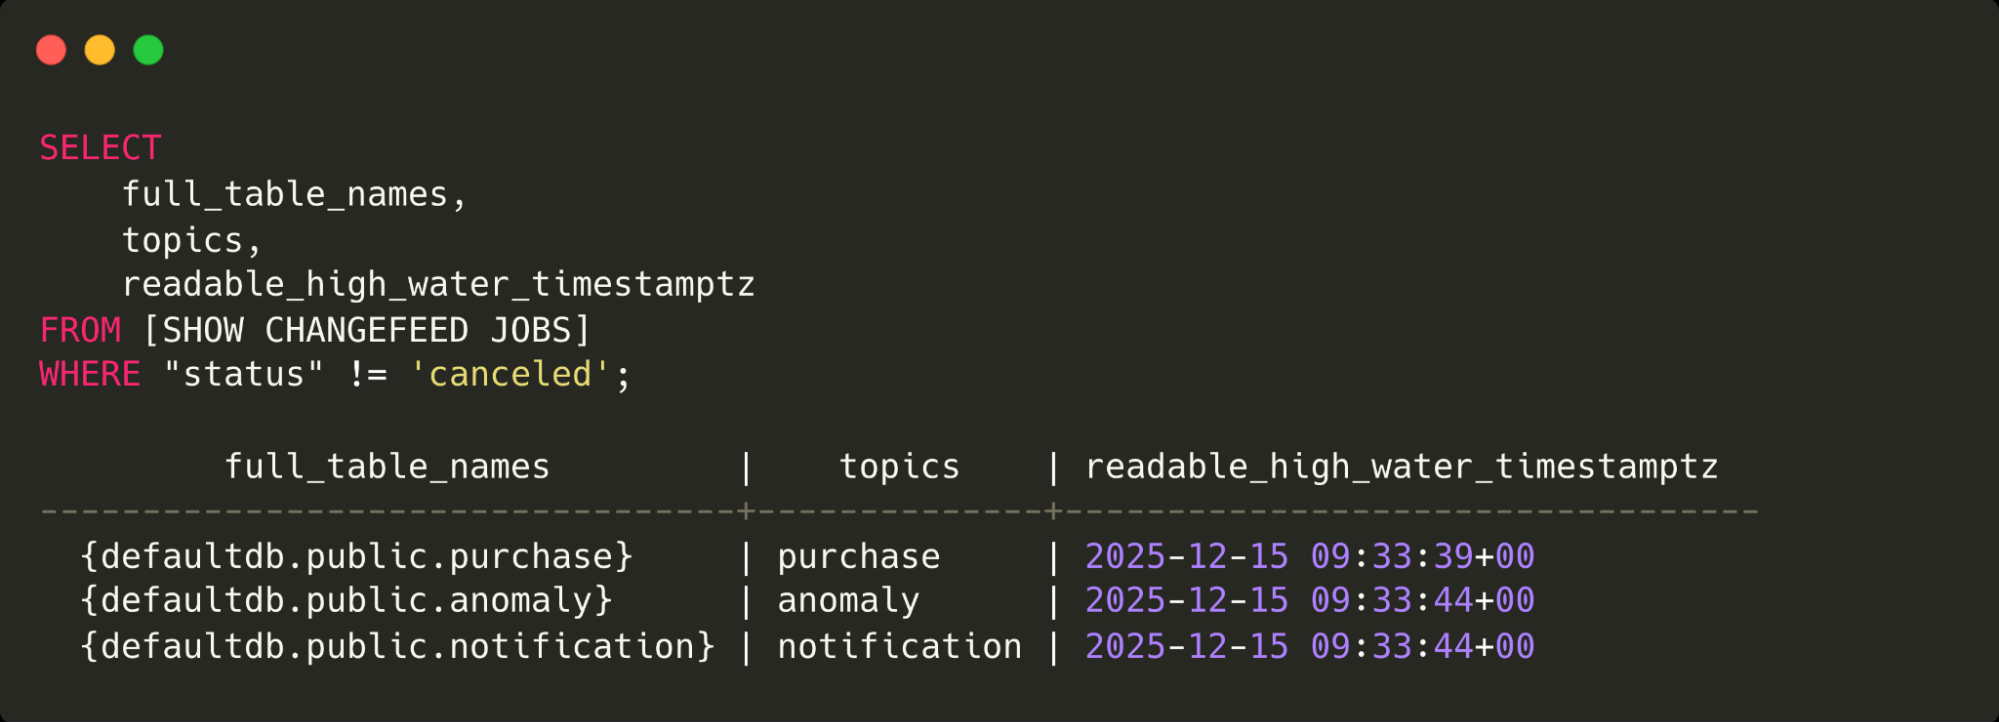
This query shows the changefeed jobs in CockroachDB and the topics where messages will be sent.
Step 7: Build & Deploy Anomaly Detection Agents
Build the agent Docker image using the build_agent Make target (updating the REGISTRY variable as needed):
REGISTRY=codingconcepts/large-scale-agentic VERSION=v0.13.0 make build_agentDeploy them:
kubectl apply -f infra/agent_anomaly_detection.yaml
kubectl apply -f infra/agent_reasoning.yaml
kubectl apply -f infra/agent_notification.yaml
Step 8: Simulate Traffic and Monitor Agents
Use kubetail to watch logs:
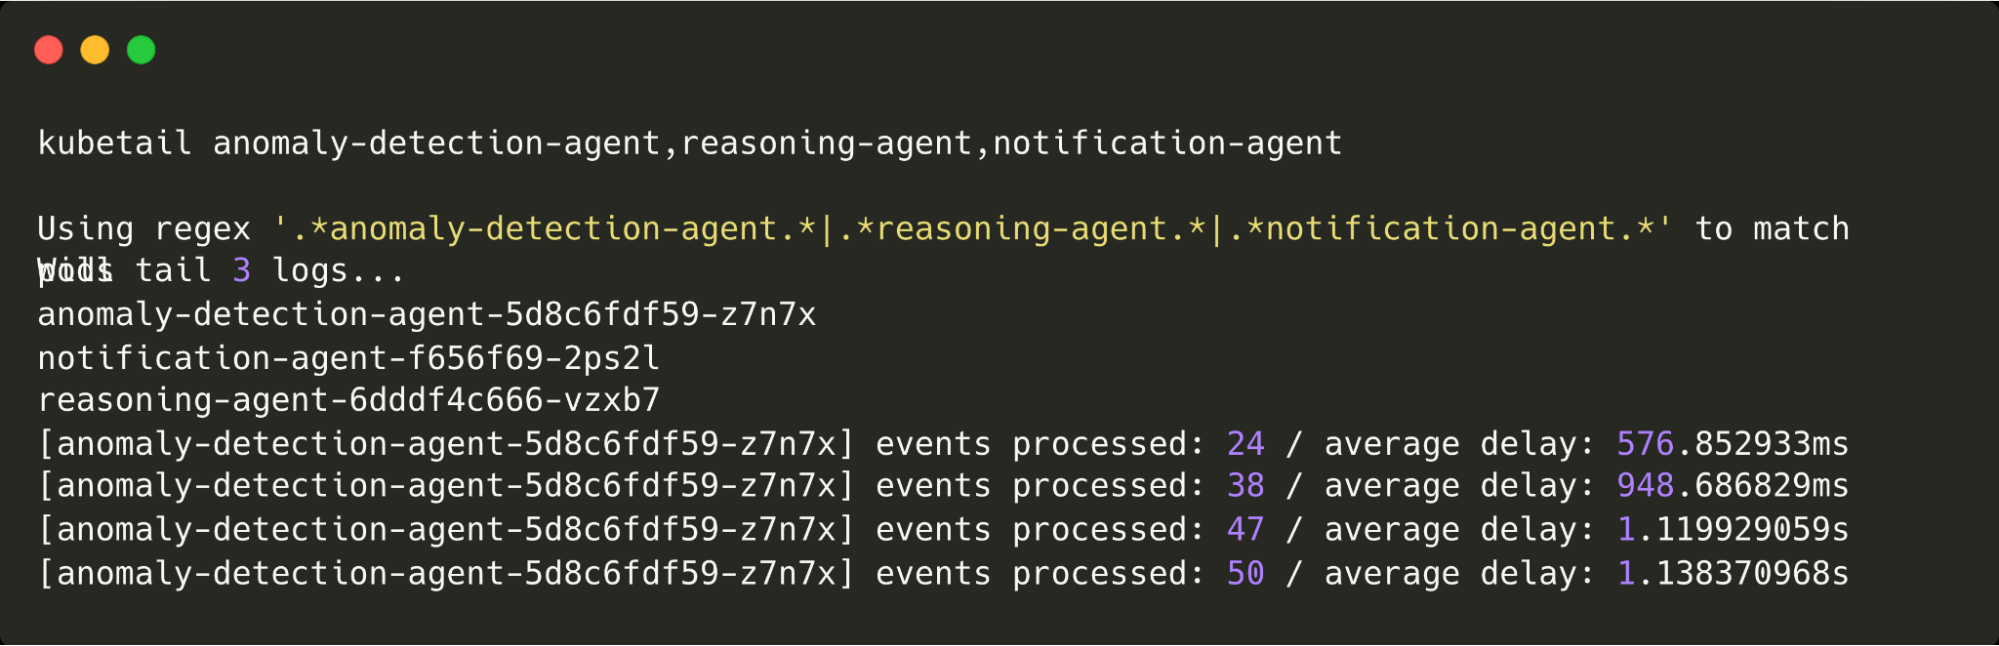
These are the logs being written by all agents. Note that because there are currently no anomalies being detected, only the anomaly detection agent is logging.
Step 9: Trigger Anomalies
Now for the anomalies. First, we make a purchase that’s in a different location to the typical purchases:
INSERT INTO purchase(customer_id, amount, location) VALUES (
'c7fc4006-3f39-4baf-ad93-5870f3ec27ec', 50,
'POINT(-86.778 36.160)'
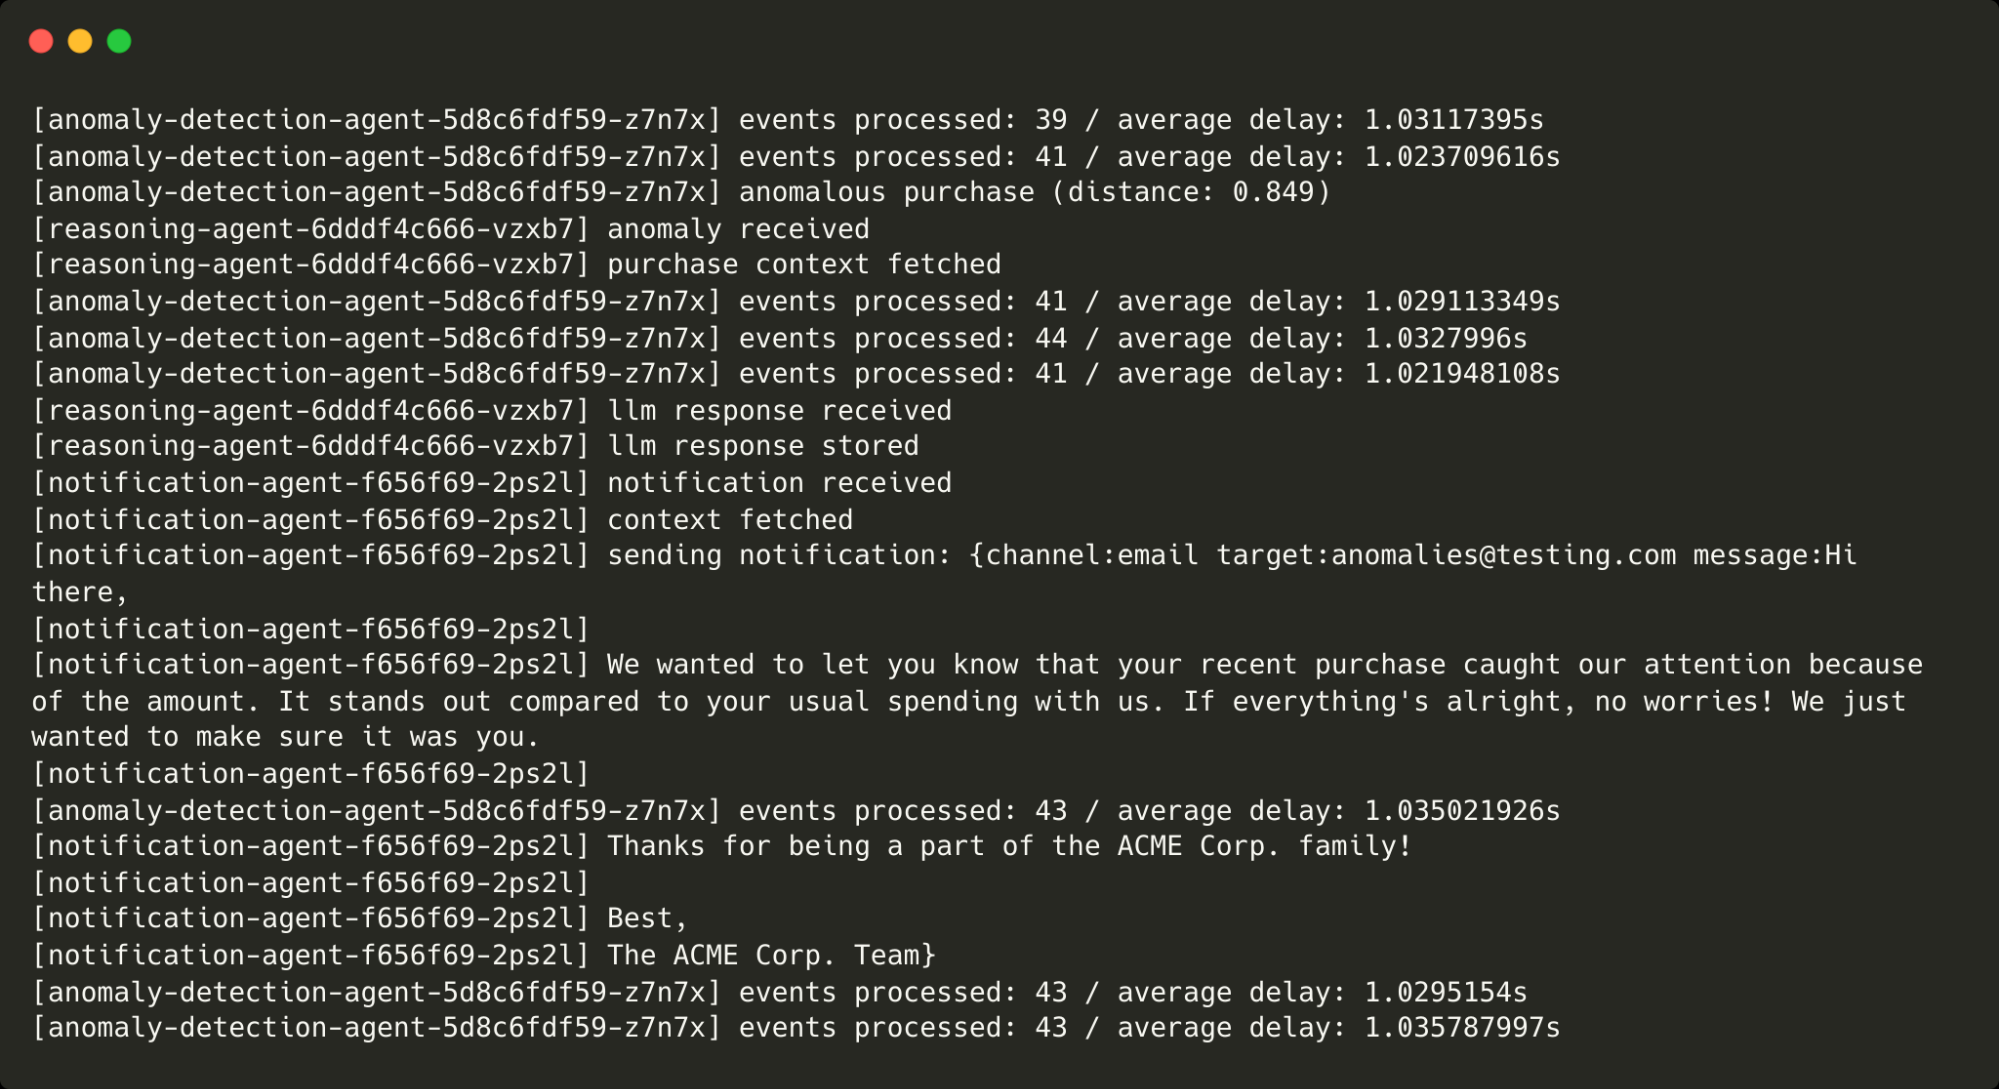
);This is flagged as anomalous by the anomaly agent, passed (via CockroachDB) to the reasoning agent (and the LLM), then onto the action agent, which prints the message that would have been sent. You can see the message below:

Next, we make a purchase whose amount is way above our regular purchases:
INSERT INTO purchase(customer_id, amount, location) VALUES (
  'c7fc4006-3f39-4baf-ad93-5870f3ec27ec', 10000,
  'POINT(-0.571 51.244)'
);
This is flagged as anomalous and makes its way through the agents as before.
Finally, we allow the anomaly agent to fall behind and for changefeed messages to build up. If left unchecked, this would result in ever-increasing delays to changefeed messages being processed (although foreground traffic would not be affected).
This could happen for a number of reasons but in this scenario, we ramp up the number of virtual customers from 50 to 100 to simulate increased traffic. At around 100 virtual customers, the under-provisioned anomaly detection agent (that’s only capable of processing around 50 events without falling behind) is unable to process incoming messages quickly enough, so the work needs to be shared between multiple agents.
To scale the anomaly agent, we simply increase the number of replicas in the Kubernetes deployment as follows:
kubectl scale deployment anomaly-detection-agent --replicas 3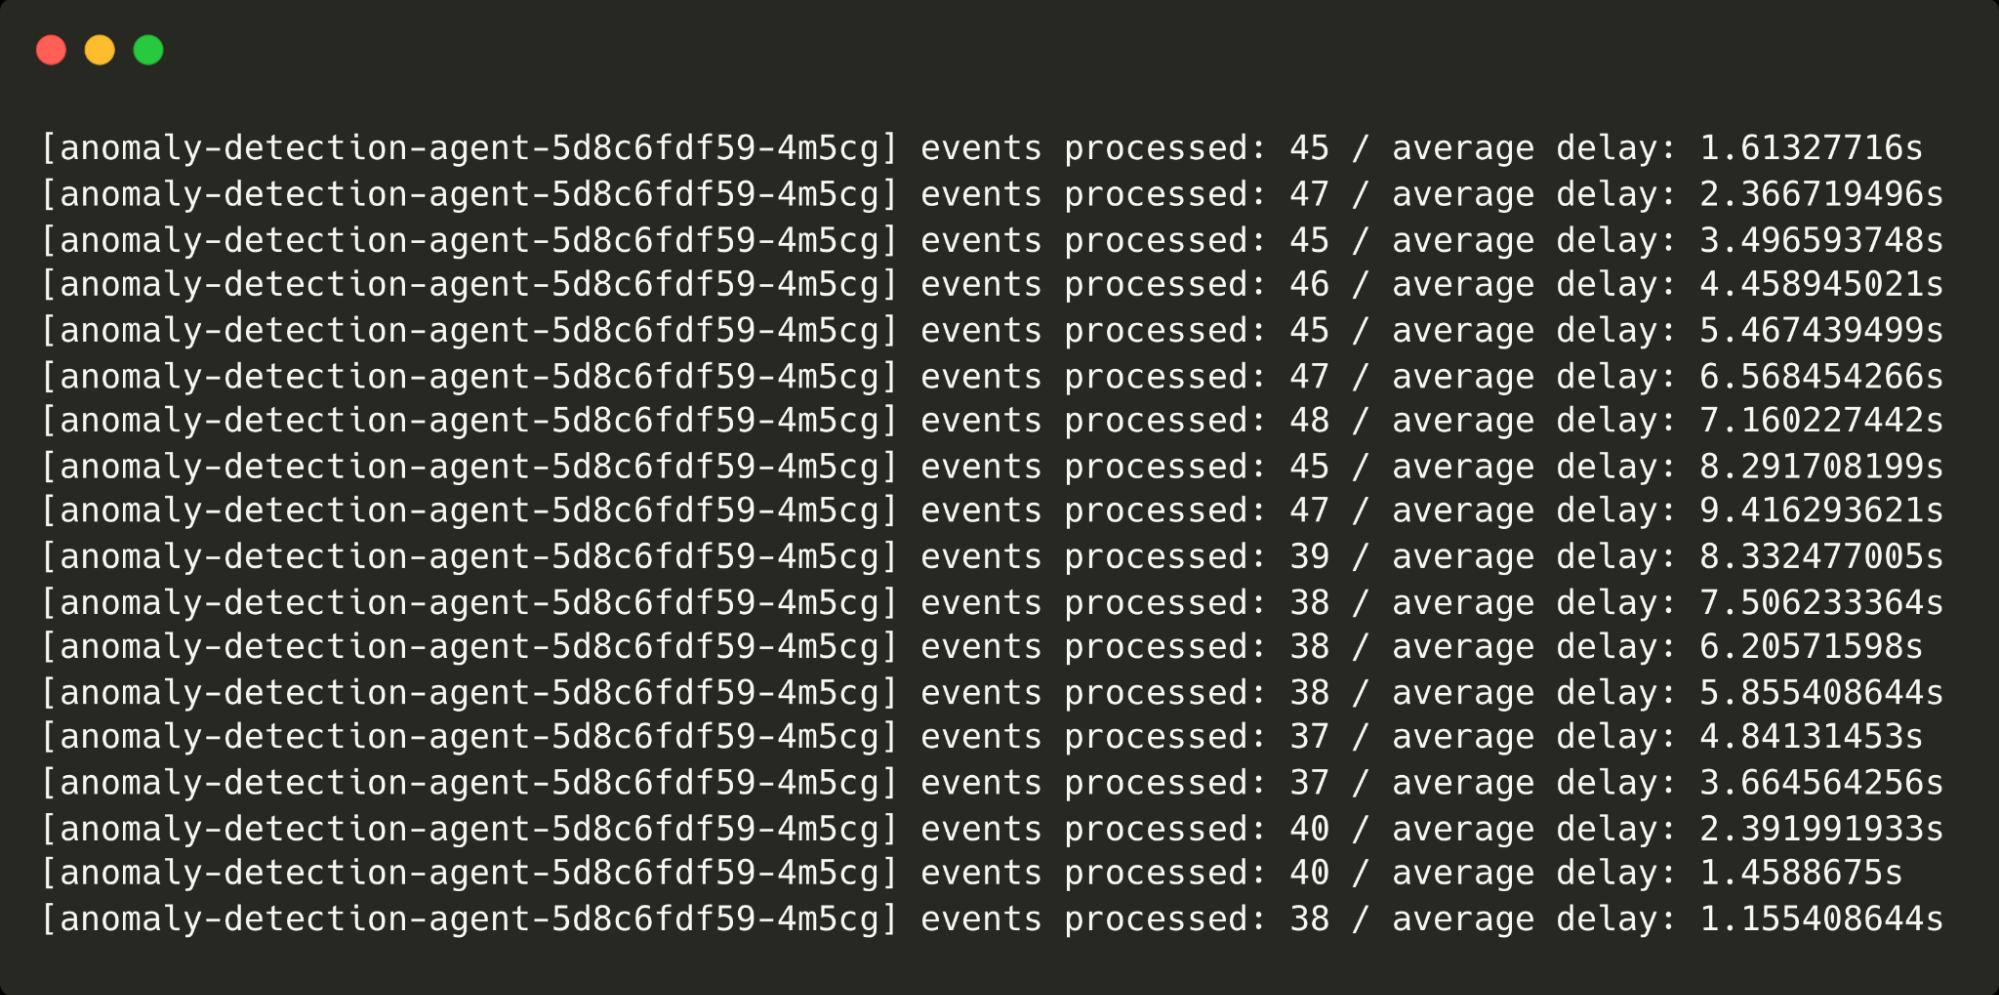
Notice the point at which I scale the agents and the delays come back down from over 9s to around 1s.
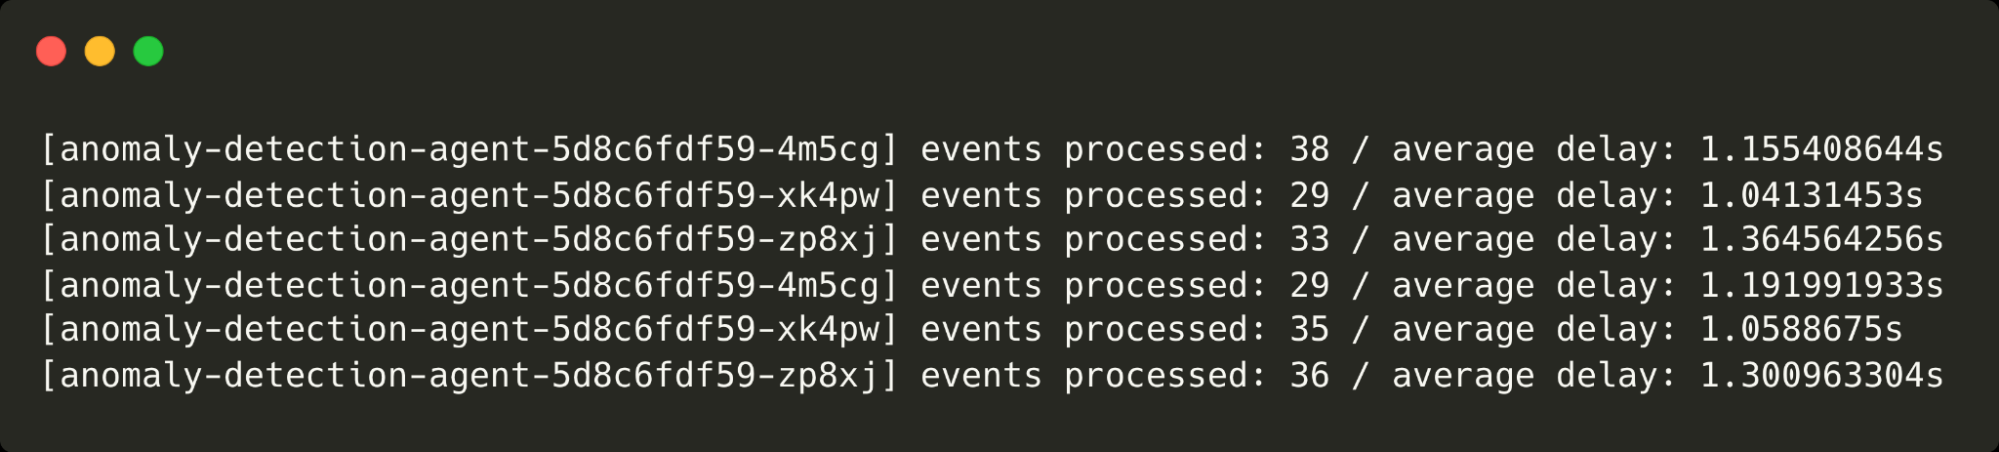
The three anomaly detection agents are running and processing purchase events.
Learn more about how top AI Innovators are achieving success with CockroachDB.