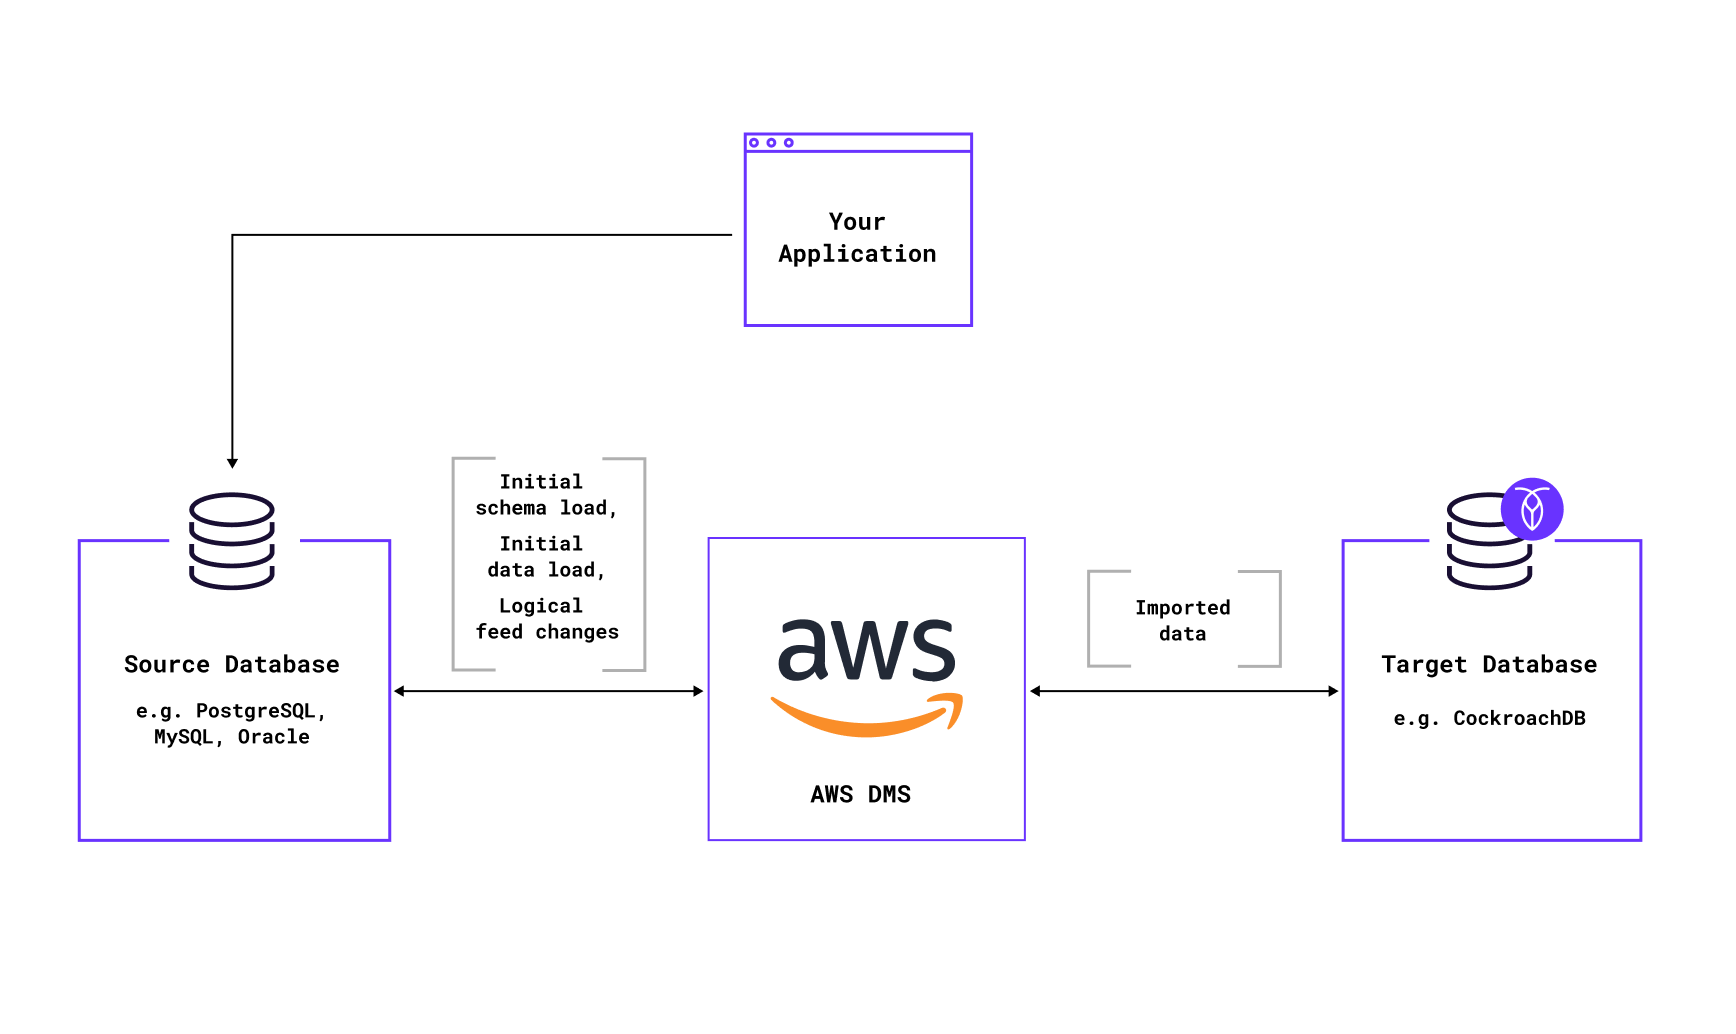
Data migrations are always challenging: how can you manage costs, complexity of cloud architectures, data consistency, and more. In particular, many customers expect always-on services these days, and many companies leverage real-time data to ensure the optimal user experience and product. For many companies, a large-scale migration of real-time data means minimizing the downtime is critical. While there are a number of tools to choose from, this blog explores how to leverage AWS Database Migration Service (DMS) to migrate from Aurora PostgreSQL to CockroachDB using a replication instance.
CockroachDB has built a native migration tool called MOLT (Migrate Off Legacy Technology) to simplify migrations. MOLT provides tools to convert schemas for CockroachDB compatibility, load test and production data, and validate queries. However, some customers prefer using AWS Database Migration Service (DMS) for their existing pipelines. This blog explores how to leverage AWS DMS for change data capture (CDC) replication when migrating from Aurora PostgreSQL to CockroachDB using a replication instance. This guide highlights how to configure DMS to work seamlessly with CockroachDB as the target, allowing you to continue using your existing ETL pipeline without modification, just as you did with a self-managed PostgreSQL or Aurora PG target machine.
Why Choose Change Data Capture (CDC)?
Change Data Capture (CDC) is a way of supporting ongoing replication, which keeps track of changes to data over time. While there are other options that one can choose when utilizing AWS, CDC is a great option for those who want to:
Minimize downtime: CDC continuously replicates data changes, allowing applications to function with minimal disruption.
Ensure data consistency: Every insert, update, and delete operation is captured and applied in real-time.
Facilitate hybrid cloud and multi-region architectures: Enables smooth transitions between cloud providers.
AWS DMS, when configured with CDC, provides an efficient way to transition from Aurora PostgreSQL to CockroachDB, ensuring high availability and fault tolerance. Prerequisites
Before beginning the migration, ensure you have:
An AWS Account with permissions to manage AWS DMS resources.
An Aurora PostgreSQL 15 source database configured for logical replication.
CockroachDB target instance.
Network connectivity between the source, target, and the AWS DMS replication instance.
Step 1: Pre-Configuring Aurora PostgreSQL for CDC
We can use the logical replication feature in Aurora PostgreSQL. This feature allows users to replicate and synchronize individual tables rather than entire database instances. Using this will allow us to migrate data that sits within Aurora PostgreSQL. To enable logical replication, we must configure key database parameters:
1.1 Enable Logical Replication
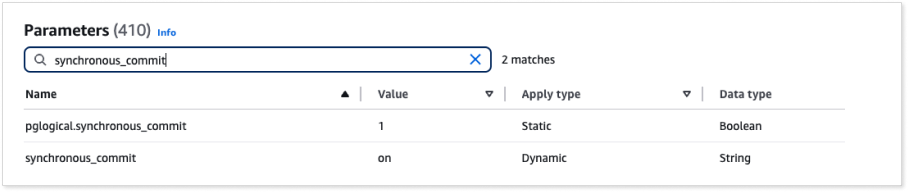
Modify the following parameters in your DB cluster parameter group:
✅ Set synchronous_commit to ON
Access the AWS RDS Console: Log in to your AWS Management Console and navigate to the Amazon RDS.
Select Your Aurora PostgreSQL Cluster: Locate your Aurora PostgreSQL cluster and choose the associated DB cluster parameter group.
Edit the Parameter Group: Find the
synchronous_commitsetting and set it toON.Apply Changes: Save the changes and reboot the database instance to ensure the new setting takes effect.
✅ Set rds.logical_replication to 1

Navigate to the RDS Console: Open the AWS RDS console and locate your Aurora PostgreSQL cluster.
Modify the Parameter Group: Edit the DB cluster parameter group and change the rds.logical_replication parameter to 1.
Reboot the Instance: Save your modifications and reboot your instance to apply the change.
✅ Use pglogical Instead of Native Replication

Update shared_preload_libraries: In the DB cluster parameter group, add
pglogicalto theshared_preload_librariesparameter.Create the Extension: Connect to your Aurora PostgreSQL database using your preferred SQL client and execute the following command:
CREATE EXTENSION pglogical;Verify Installation: Confirm that the
pglogicalextension is successfully installed and operational.SELECT * FROM pg_extension WHERE extname = 'pglogical';

Step 2: Configuring AWS DMS Endpoints
2.1 Source Endpoint (Aurora PostgreSQL)

1. Open AWS DMS Console → Navigate to Endpoints → Click Create endpoint.
2. Choose PostgreSQL as the source engine and enter the connection details:
Server Name: XXXXX.ap-south-1.rds.amazonaws.com
Port: 5432
Database Name: <DatabaseName>
User Name: postgres
3. Test Connection to verify connectivity.
2.2 Target Endpoint (CockroachDB)
Since CockroachDB is PostgreSQL-compatible, configure it as a PostgreSQL endpoint.
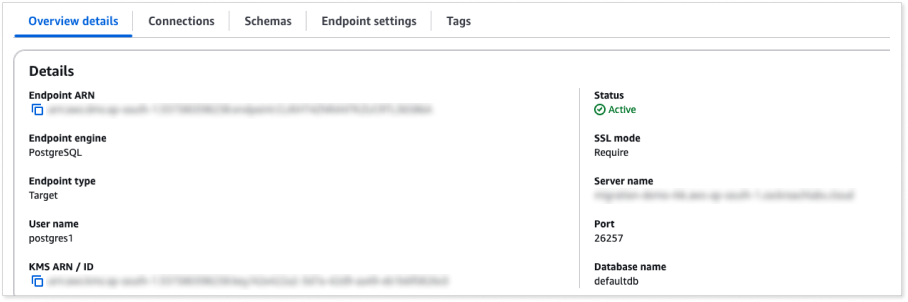
1. AWS DMS Console → Create a new target endpoint.
2. Choose PostgreSQL as the target engine and enter the following details
Server Name: XXXX.cockroachlabs.cloud
Port: 26257
Database Name: defaultdb
User Name: postgres1
3. Enable SSL Encryption: Set SSL Mode to Require.
4. Test Connection and confirm the Active status.
Step 3: Configuring DMS Migration Task
NOTE: To avoid a permission issue, we will create the table structure and required schemas on the CockroachDB cluster before starting the DMS job manually.
Go to AWS DMS Console > Create a new migration task.
Select:
Replication instance
Source endpoint: Aurora PostgreSQL
Target endpoint: CockroachDB
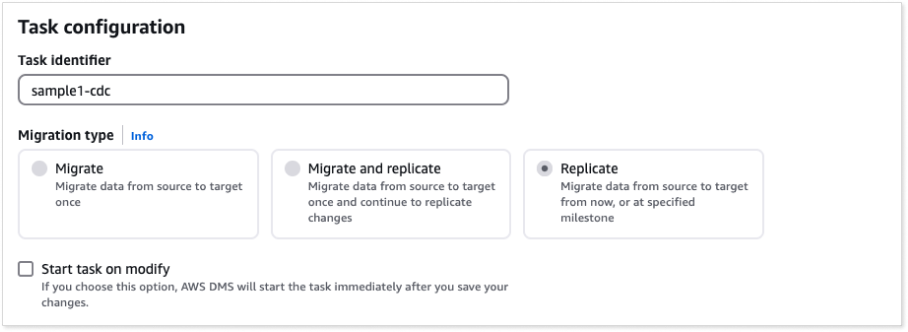
Choose Migration Type: Replicate (CDC).
Disable the Table creation on Target since we have already created schema on target.
Enable Data Validation and Logs: We can optionally keep the "Validation with Data migration" setting. this will allow DMS to compare the data at the source and target.
Mapping Rules for Efficient Data Migration: Set specific mapping rules to refine how the data is replicated. See below for details.
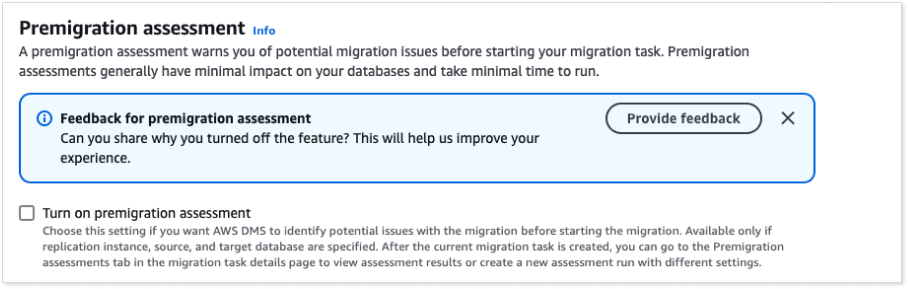
Disable Premigration Assessment: When configuring AWS DMS with CockroachDB as the target, it is important to disable assessment mode because CockroachDB's managed cloud environment does not provide full system permissions. The
crdb_internal schemais read-only. Since CockroachDB is PostgreSQL-compatible, schema validation and creation needs to be managed externally without DMS assessments.
More on Mapping Rules for Efficient Data Migration
Mapping rules are essential for refining the data that is replicated. They allow you to include only the relevant tables and schemas and exclude those that are not required or those that could cause issues, thereby optimizing the migration process.
Mapping Rule Examples
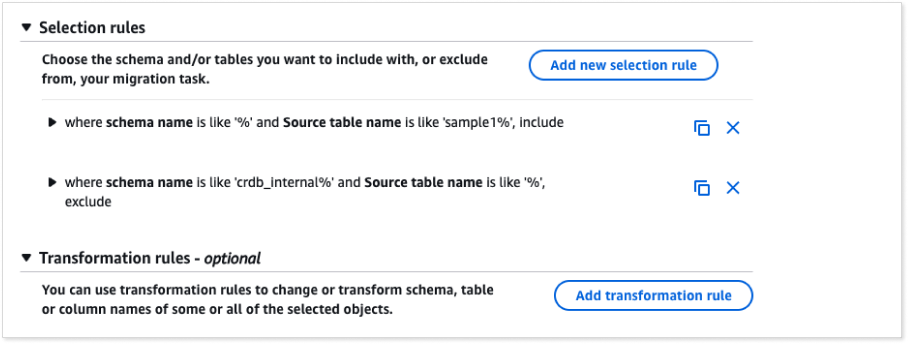
Example 1: Include tables whose names start with “sample1” in any schema
WHERE schema_name LIKE '%' AND source_table_name LIKE 'sample1%'Example 2: Exclude the crdb_internal schema (Required if cockroach DB is configured to be source)
WHERE schema_name LIKE 'crdb_internal%' AND source_table_name LIKE '%'NOTE: Excluding the crdb_internal schema is essential, as including these internal CockroachDB tables during replication can lead to errors, and they do not pertain to your application data.
Transformation Rules (Optional): If necessary, you can define transformation rules to modify data or schema names during migration. These rules are optional but can be invaluable when your target database schema requires adjustments to match the source data.
RELATED
Riskified, an all-in-one eCommerce fraud management platform that supports global brands like Prada, Wayfair, and Canada Goose, migrated from their PostgreSQL system to CockroachDB using AWS DMS and CockroachDB's Change Data Capture (CDC) feature.
How to Configure DMS with a Custom Start Point
In some scenarios, you may want your migration to begin from a specific point in your transaction log rather than from the current position. This section explains how to set up a custom Log Sequence Number (LSN) and incorporate it into your AWS DMS task.
Set Up a Custom LSN
Before configuring your migration task, determine the precise LSN from which you want the CDC process to start. This is especially useful when you need to capture changes from a known point in time.
Find the Existing Replication Slot
AWS DMS automatically creates a logical replication slot (e.g., dms_slot) on your Aurora PostgreSQL instance. To locate and verify the replication slot:
Connect to the Source Database
Identify the replication slot created by AWS DMS using the following command:
SELECT * FROM pg_replication_slots;
Fetch the LSN
To determine the starting LSN, fetch the current changes from the replication slot using a filtering query. For example, if you want to capture changes related to tables containing "sample1" in their data, run the following SQL command:
SELECT lsn, xid, data
FROM pg_logical_slot_get_changes('dms_slot_NAME', NULL, NULL)
WHERE data LIKE '%sample1%';
This query returns the LSN, along with the transaction ID (xid) and the associated data. Use the LSN value from this output as your custom start point.
Configure the DMS Task with the Custom Start LSN
Once you have the desired LSN, follow these steps to configure your DMS task:
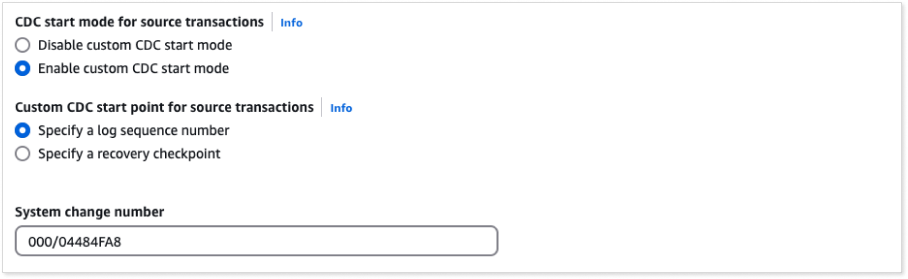
Access the AWS DMS Console: Log in to your AWS Management Console and navigate to the DMS section.
Edit the CDC Task Settings: Enable custom CDC start mode, and specify a log sequence number.
Input the Custom LSN: Enter the LSN value you obtained from your query as the starting point for the replication.
Save and Restart the Task: Save your changes and restart the DMS task to begin replication from the specified LSN.
By configuring a custom start point, you ensure that your CDC process begins exactly where needed, capturing all relevant changes without duplication or data loss. This fine-grained control is crucial for achieving a smooth, efficient migration.
Configuring DMS with a Custom/Manually Created Replication Slot for PostgreSQL
For enhanced control over your CDC process, you can manually create and manage logical replication slots in PostgreSQL. This allows you to precisely dictate the replication start point and monitor changes effectively. Follow the steps below to set up a custom replication slot and integrate it into your AWS DMS configuration:
Create the Logical Replication Slot
Using the default decoding plugin:
SELECT pg_create_logical_replication_slot('my_slot', 'test_decoding');Verify Slot Creation
Confirm that the replication slot was created successfully by querying the replication slots:
SELECT * FROM pg_replication_slots;This command should list your new slot (e.g., my_slot1 or my_wal2json_slot) along with details about its state.
Simulate Data Changes
Test the replication slot to ensure it captures changes by inserting data into your source table:
INSERT INTO sample1_table (column1, column2) VALUES ('value1', 'value2');Update the Source Endpoint in DMS
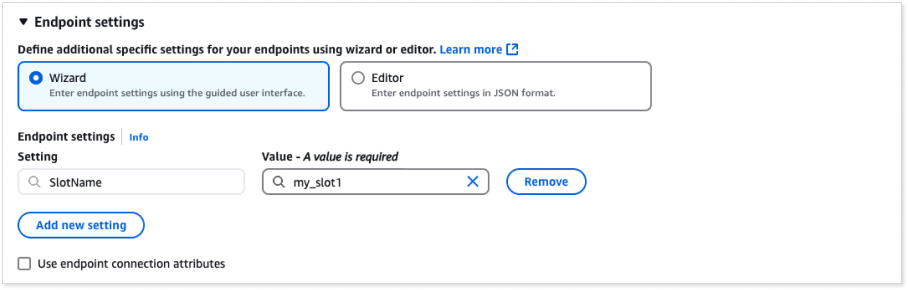
Finally, integrate your custom replication slot with your AWS DMS configuration. Modify the source endpoint settings by adding the custom slot name in the extra connection attributes. For example: slotName=my_slot1
Start the DMS Job
After modifying the DMS job settings and updating the source endpoint for a custom slot for CDC, you can start the DMS job from the DMS console to initiate CDC replication.
Note: By default, AWS DMS automatically starts the task upon creation. However, in certain scenarios, you may need to delay the task's start. For instance, when using the AWS CLI, you might have one process that creates the task and another that starts it based on a specific triggering event. If necessary, you can configure the task to start at a later time.
Database Modernization with CockroachDB and AWS
In conclusion, leveraging AWS DMS for migrating from Aurora PostgreSQL to CockroachDB using CDC replication offers a streamlined, efficient solution for managing real-time data changes with minimal downtime. This guide has demonstrated how to configure your source and target endpoints, set up custom replication slots, and fine-tune migration tasks to ensure that your existing ETL pipelines remain intact even as you modernize your database architecture.
Finally, if you’re looking to explore distributed SQL databases further, consider trying CockroachDB on AWS Marketplace to experience the benefits of high availability and easy scalability firsthand. Get started today and experience the benefits firsthand.