When your application talks to your database over the public internet, every hop is one more place something can go wrong, leading to potential latency, misconfiguration, or (worst case) exposure.
Azure Private Link fixes that by creating a private, point‑to‑point “secret tunnel” between your Azure VNet and your CockroachDB Cloud cluster. Traffic stays on the Microsoft backbone, never traversing the public internet, while your application connects using a familiar DNS name.
Azure Private Link gives Azure workloads private access to supported services through a private endpoint, so database traffic can stay inside your network boundary instead of crossing the public internet. For teams running regulated, latency-sensitive, or business-critical applications, that means tighter network control, a smaller exposure surface, and a more controlled path to private-by-default database connectivity.
This guide walks you through a clean, step‑by‑step setup of Azure Private Link on CockroachDB:
Tighten network controls first
Then create and validate the private endpoint
Finally, wire up DNS so TLS verification works correctly
Pre‑flight checklist for Azure Private Link
Before you touch any settings, make sure the basics are in place.
Start by validating the network, permissions, and DNS prerequisites that make private endpoint deployments predictable. Catching region mismatches, DNS forwarding gaps, or subnet capacity issues early helps prevent delayed cutovers, failed validation, and last-mile connection problems later in the setup.
Permissions
Azure: You must be a Network Contributor or Owner on the subscription/resource group where you’ll create the Private Endpoint.
CockroachDB Cloud: You must be an Admin or Network Admin for the target cluster.
Network & Capacity
Region alignment: Your Azure VNet region must match your CockroachDB Cloud cluster region to avoid unnecessary latency.
Subnet capacity: Use a subnet with at least 5–10 free IPs so Private Endpoint and related resources have room to allocate addresses.
DNS Forwarding (if using custom DNS)
If your VMs use a custom DNS server (e.g., Windows Domain Controller or custom resolver), forward queries to Azure’s WireServer DNS:
Forward to:
168.63.129.16Quick connectivity check from a VM:
nc -zv 168.63.129.16 53
# Connection to 168.63.129.16 53 port [tcp/domain] succeeded!
This capability is vital for your private DNS server (e.g., a Domain Controller) to find Azure's internal hosts. It forwards requests to Azure's WireServer, preventing "Host Not Found" errors.
Firewall / NSG Rules
Ensure outbound traffic on TCP port 26257 is allowed from your application subnet to the Private Endpoint (your NSG must not block it).
Once these are in place, you’re ready to create the private connection.
Related
CockroachDB on Azure: Enabling HIPAA & PCI Readiness
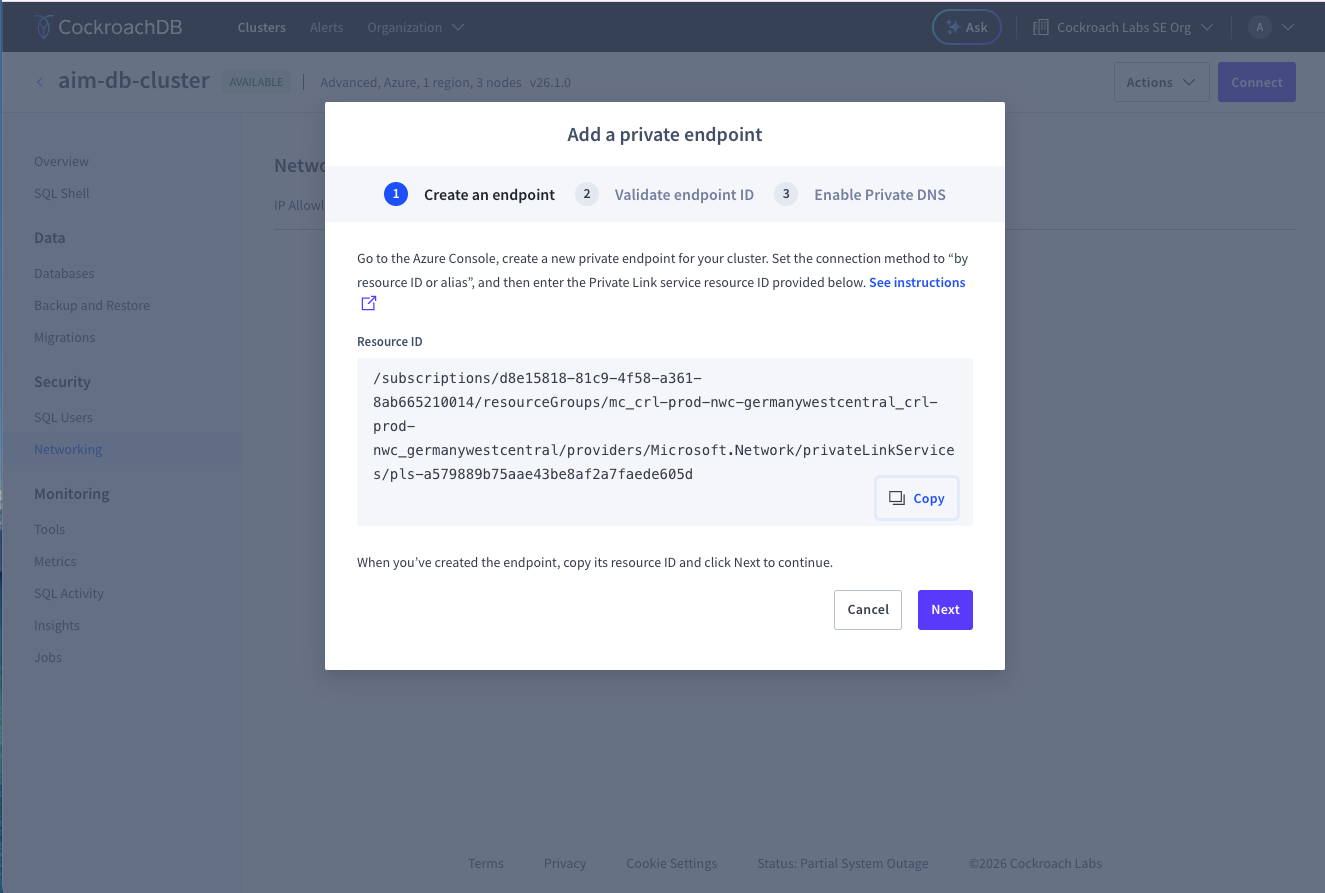
Step 1: Initialize the private endpoint in CockroachDB Cloud
Generate the Private Endpoint alias first. This gives Azure a specific, private spot to connect to. Then, when you build the Azure endpoint, it plugs right into your cluster without touching the public internet.
Important: Leave this browser tab open. You’ll return here in Step 3 to validate the connection.
1. Open CockroachDB Cloud Console and select the cluster you want to secure with Private Link.
2. Go to the Networking tab.
3. Select Private endpoint.
4. Click Add Private Endpoint.

5. Select the Region.
6. Copy the Alias shown in the UI. Important: Leave this browser tab open. You’ll return here in Step 3 to validate the connection.
Step 2: Create the Azure private endpoint
You’ll now create the Azure side of the “private tunnel” using the alias from CockroachDB Cloud. By linking a Private Endpoint in the right VNet/subnet to the CockroachDB alias, all your database traffic is locked down to a specific private IP on Azure for totally private, no-public internet.
2.1 Create the Private Endpoint Resource
1. In the Azure Portal, search for Private endpoints. 2. Click Create. Basics tab
3. Choose or create a Resource group in the same region.
4. Enter a Name for your private endpoint (e.g., my-private-endpoint).
5. Select the Region that matches your CockroachDB Cloud cluster.
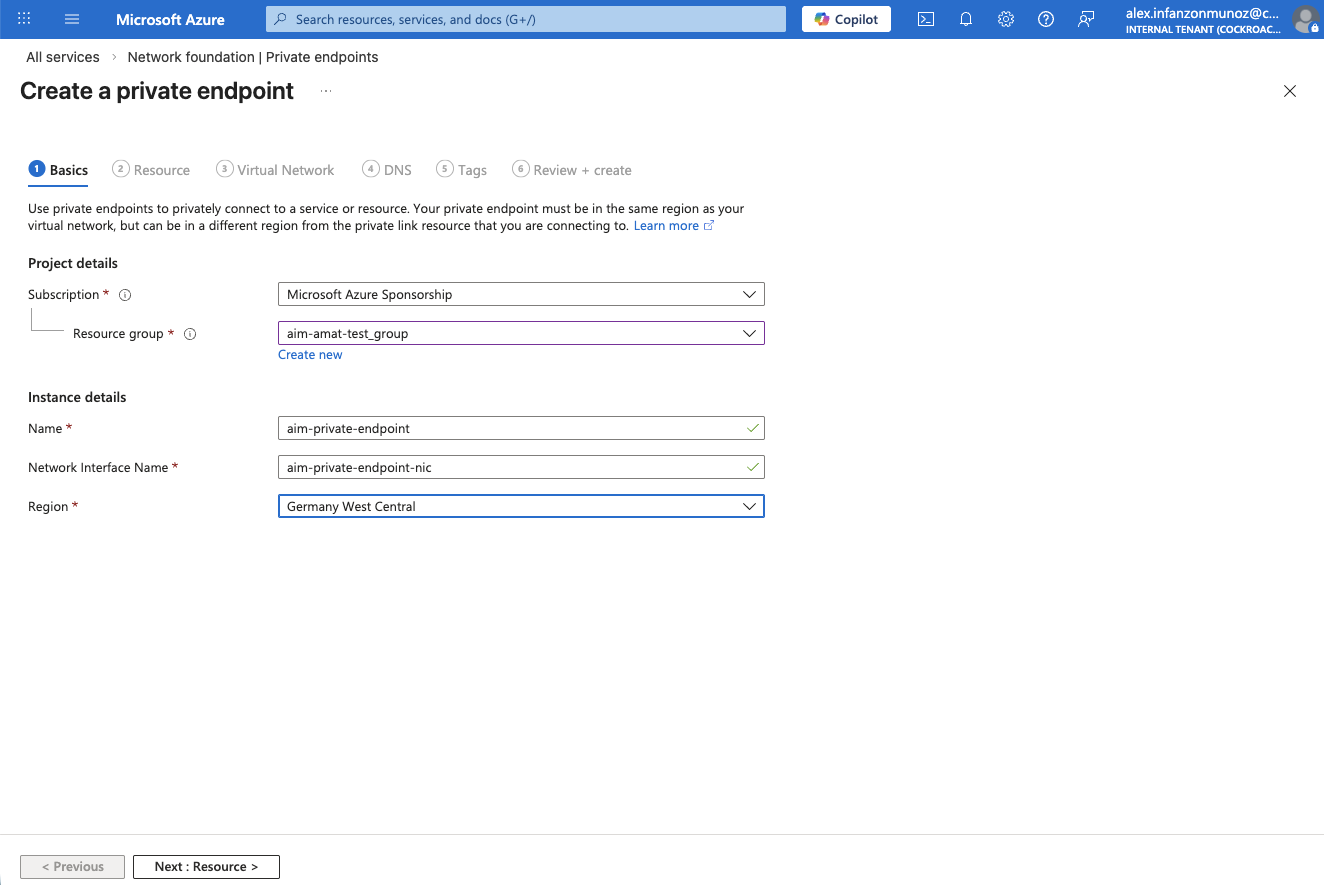
6. Click Next: Resource. Resource tab 7. Under “Connection method”, select Connect to an Azure resource by resource ID or alias.
8. In Resource ID or alias, paste the Alias you copied from CockroachDB Cloud (Step 1).
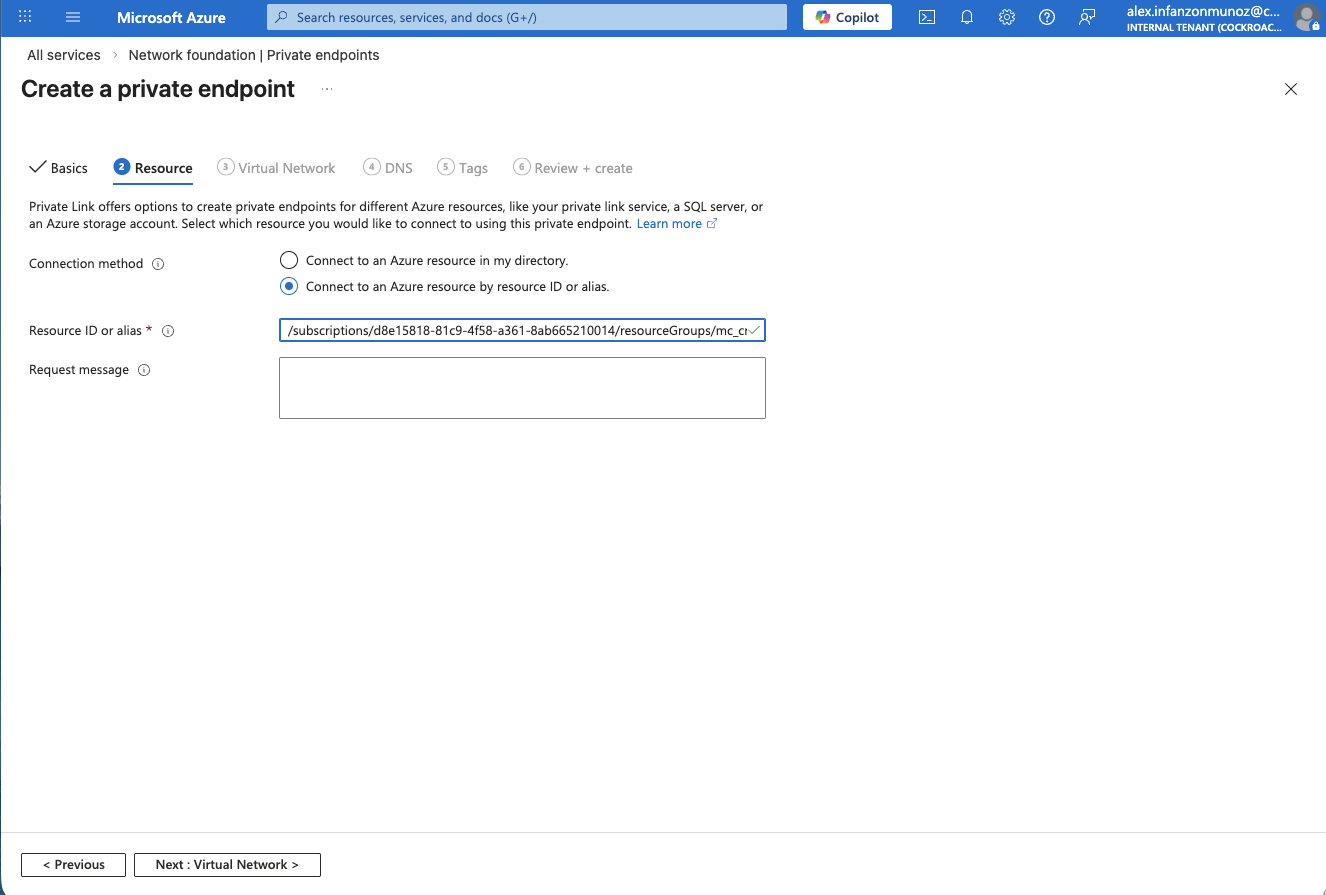
9. Click Next: Virtual Network.
Virtual network tab
10. Under Networking, select the Virtual network and Subnet where your application VMs live (the clients that will connect to CockroachDB). 11. Click through the remaining tabs (DNS, Tags, Review + create).
You can typically accept the defaults for these.
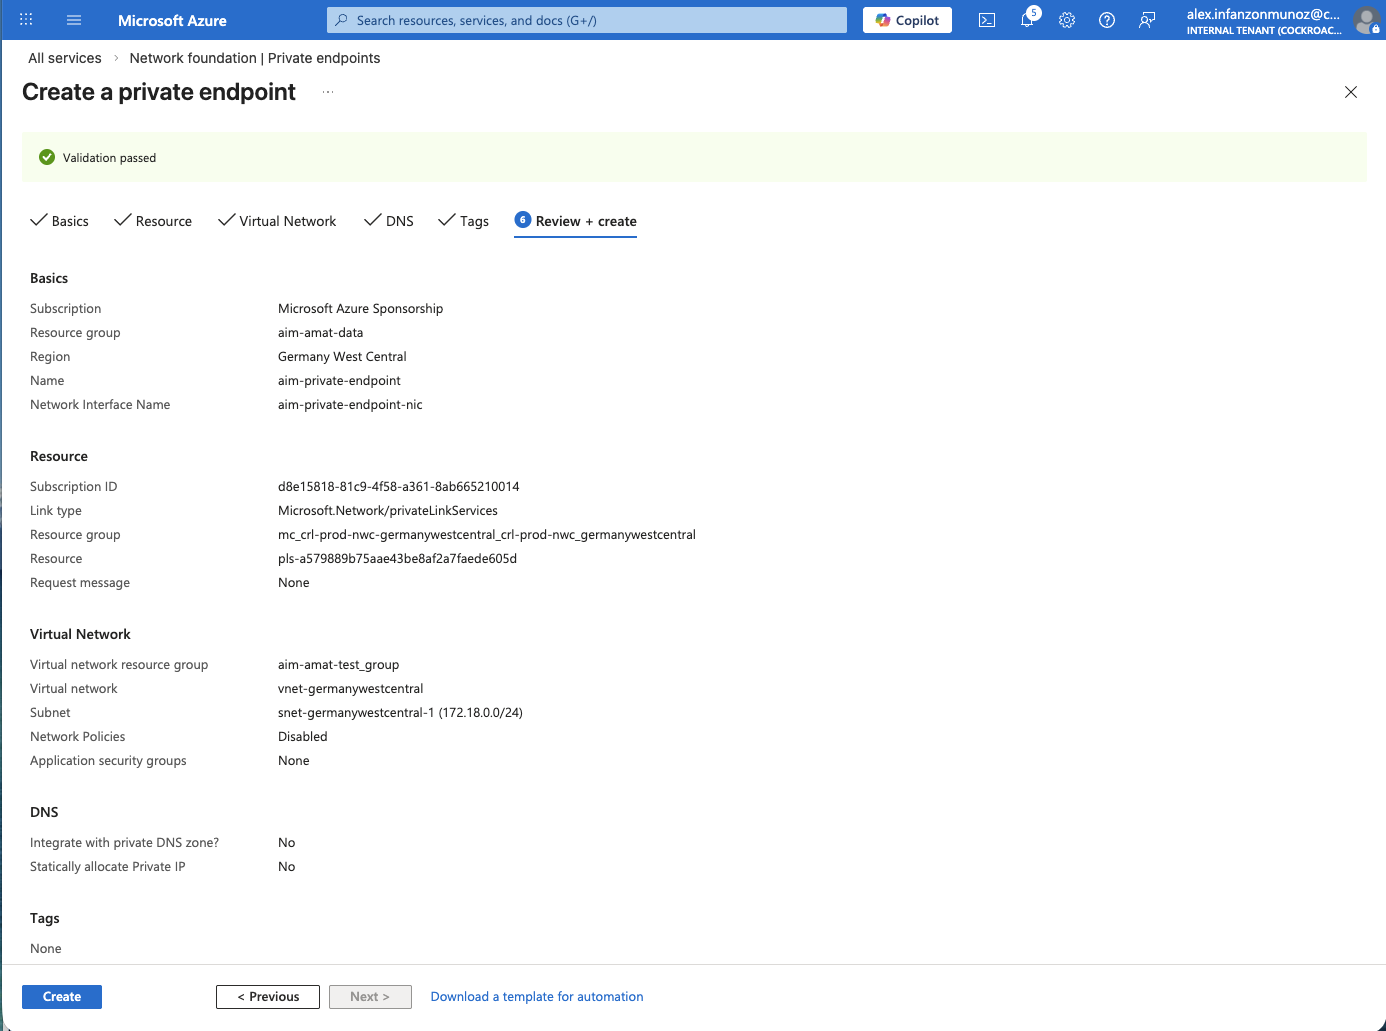
12. Click Create.
Note: Deployment usually takes a few minutes.
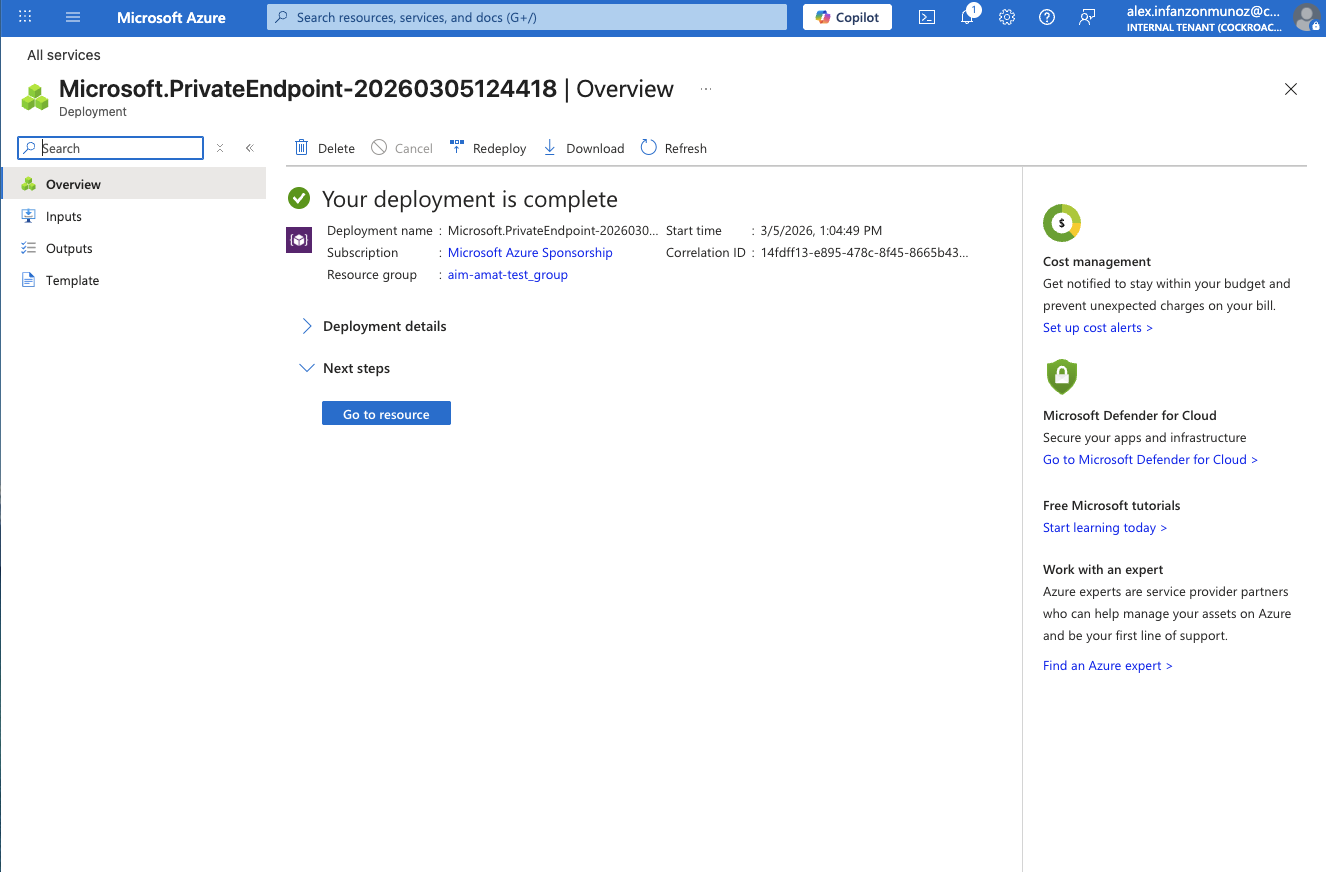
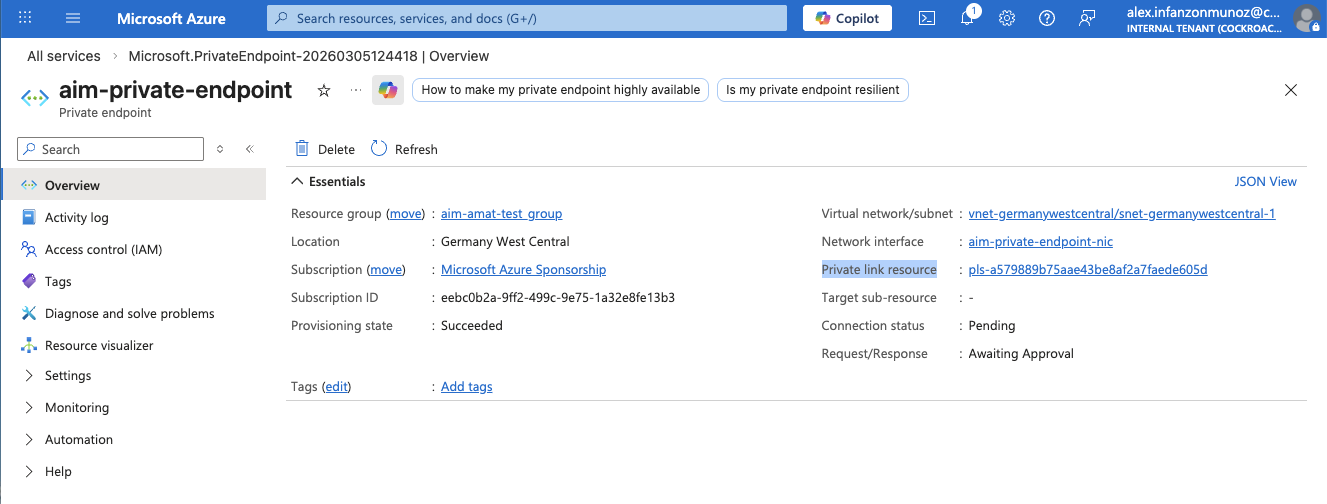
2.2 Capture the Azure Private Endpoint Resource ID
Once deployment completes:
Open your newly created Private endpoint (either click Go to resource or select it from the Private endpoint list)
From the Overview. Copy the “Private link resource” ID, which looks similar to:
pls-a579889b75aae43be8af2a7faede605d
You’ll need this in the next step to validate the connection from CockroachDB Cloud.
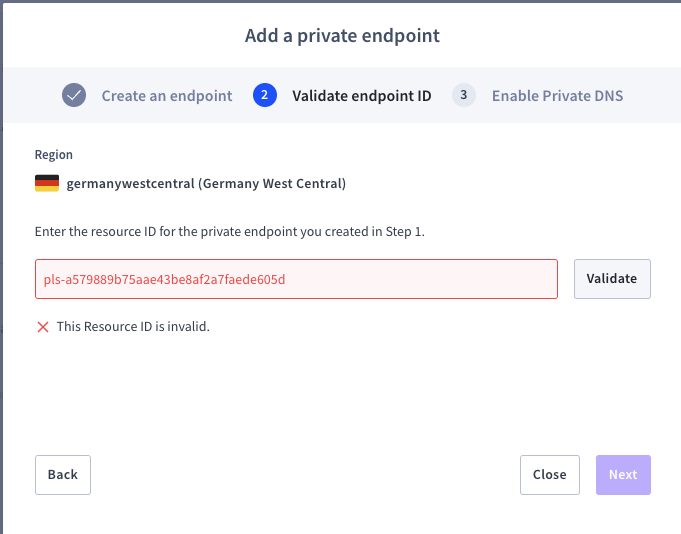
Step 3: Validate the private endpoint connection in CockroachDB Cloud
This validation step confirms that the Azure private endpoint you created is the one allowed to establish private connectivity to the cluster. In practice, it ties the Azure-side resource to the CockroachDB-side configuration so private access is intentional, auditable, and limited to the expected endpoint.
Next, "pair" the Azure Private Endpoint with your CockroachDB cluster. The correct Azure Resource ID ensures only that endpoint can access the cluster via Private Link.
Return to the CockroachDB Cloud Console tab from Step 1.
Click Next.
Paste the Azure Resource ID you copied at the end of Step 2 into the validation field.
Click Validate.
IMPORTANT: If you see this message while validating:
5. Click Close
6. In the far right of the row for this private endpoint, click Actions → Finish setup You will get a confirmation message:
“Your endpoint has been accepted. Once your endpoint status changes to Available in the Azure console, click Next to continue.”
7. Click Next.
8. Copy and save the Internal DNS name.
9. Click Complete.
Note that:
The status will change to Available.
You should see both the Alias and Resource ID in the table.
10. Click Connect in the upper‑right of the Networking/Connection page. Note: Before finalizing, make sure:
A database user exists for your application.
The IP allowlist and network settings meet your security requirements.
3.1 Capture the Internal DNS Name
1. In the same Connection info window:
Under Network security, select Private endpoint.
Verify the user, region, and database.
2. Click Next.
3. Go to the Connection parameters tab.
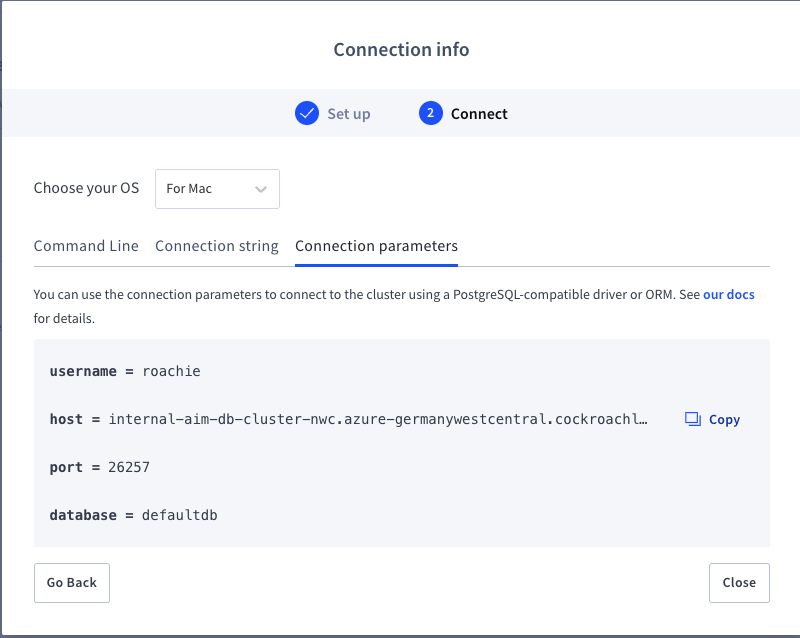
4. Copy the Internal DNS name (host); you’ll use this when you configure DNS and your client connection.
Example internal name:
internal-aim-db-cluster-nwc.azure-germanywestcentral.cockroachlabs.cloud
5. Click Close.
Step 4: Configure private DNS for Azure Private Link
To pass TLS certificate verification, your VM must resolve exactly the hostname that CockroachDB expects. That means:
The hostname from Step 3.1 (e.g.,
internal-aim-db-cluster-nwc.azure-germanywestcentral.cockroachlabs.cloud)Must resolve to the Private IP of your Azure Private Endpoint
You’ll do this using Private DNS Zones.
This is the part that often determines whether a Private Link rollout works smoothly in production. When private DNS is configured correctly, application teams can keep using the expected CockroachDB hostname while network and security teams enforce private routing underneath. The result is reduced friction during deployment and troubleshooting.
4.1 Create the Private DNS Zone
In the Azure Portal, search for Private DNS zones.
Click Create.
Basics tab
3. Select the Resource group where you want to keep DNS.
4. For Name, use the DNS suffix from your cluster’s internal name.
Example internal name:
internal-aim-db-cluster-nwc.azure-germanywestcentral.cockroachlabs.cloudCorresponding DNS zone name:
azure-germanywestcentral.cockroachlabs.cloud
5. Click Next: Private DNS zone editor.
6. Accept the defaults and click Next: Virtual network links.
Virtual network links
7. Click Add Virtual Network Link to create a new VNet link.
8. Provide a Link name (e.g., vnet-germanywestcentral-to-cockroach-link).
9. In Select virtual network, search for and select the VNet where your application VMs run.
CRUCIAL: Uncheck Enable auto-registration to avoid conflicts with existing DNS.
10. Click Create on the Add Virtual Network Link panel on the right
11. Click Review + create button
12. After the validation is complete, click Create.
Note: It may take a few minutes for the Private DNS zone and link to deploy.
4.2 Get the Private Endpoint IP Address
In the Azure Portal, search for Private endpoints.
Open the Private Endpoint you created in Step 2.
Look at the Private IP column, or open Settings → DNS configuration for the endpoint.
Note the Private IP address assigned to this endpoint.
4.3 Add the A Record in the Private DNS Zone
Now map the CockroachDB internal hostname to your Private Endpoint IP.
Go back to Private DNS zones and open the zone you created (e.g.,
azure-germanywestcentral.cockroachlabs.cloud).In the left panel, select DNS management → Recordsets.
Click Add.
Fill out the record:
Type:
AName: the cluster prefix from the internal hostname.
Example internal hostname:
internal-aim-db-cluster-nwc.azure-germanywestcentral.cockroachlabs.cloudDNS zone:
azure-germanywestcentral.cockroachlabs.cloudName field:
internal-aim-db-cluster-nwc
IP address: the Private IP from Step 4.2
4. Click Add to create the record.
At this point, VMs in the linked VNet should resolve the internal CockroachDB hostname directly to the Private Endpoint IP.
Step 5: Test DNS resolution and connect to the cluster
With networking and DNS in place, you can now test resolution and connect using the CockroachDB SQL client.
5.1 Confirm DNS Resolution
From an Azure VM in the linked VNet:
nslookup internal-aim-db-cluster-nwc.azure-germanywestcentral.cockroachlabs.cloudExample output:
Server:  127.0.0.53
Address: 127.0.0.53#53

Non-authoritative answer:
Name: internal-aim-db-cluster-nwc.azure-germanywestcentral.cockroachlabs.cloud
Address: 172.18.0.5
If the Name matches your cluster’s internal hostname and the Address matches your Private Endpoint IP, DNS is correctly configured.
5.2 Connect with the CockroachDB SQL Client
In the CockroachDB Cloud Console, copy the connection string for your cluster and adjust to use the internal DNS name.
Example:
cockroach sql \
  --url "postgresql://<user>@internal-aim-db-cluster-nwc.azure-germanywestcentral.cockroachlabs.cloud:26257/defaultdb?sslmode=verify-full&sslrootcert=<path-to-ca-cert>"
Replace:
<user>with your CockroachDB database user.<path-to-ca-cert>with the path to the CA certificate downloaded from CockroachDB Cloud.
Related
What Is VPC Peering and When Should You Use It?
What Azure Private Link changes for CockroachDB connectivity
Once this setup is complete, you’ve taken CockroachDB traffic off the public internet and locked it behind a dedicated private endpoint in your own Azure network.
For many teams, the real value of Azure Private Link is not only private routing. It’s the ability to standardize secure database access across environments while preserving the connection patterns developers already know. That helps to reduce rollout risk as applications scale.
Azure Private Link keeps database connections on the Microsoft backbone, giving you a smaller attack surface, better control for your security team, and more predictable performance next to your app. Just as important, the workflow stays familiar for developers: They still connect to a DNS name with standard drivers and TLS, while the heavy lifting happens at the network layer. In short, you get cloud‑native resilience from CockroachDB, aligned with the private‑by‑default networking model your Azure environment was designed for.
Related
Network Authorization for CockroachDB Cloud
Try CockroachDB Today
Spin up your first CockroachDB Cloud cluster in minutes. Start with $400 in free credits. Or get a free 30-day trial of CockroachDB Enterprise on self-hosted environments.
Alex Infanzon holds an M.S. in New Generation Computing from The University of Exeter. He has over 35 years of professional experience in consulting, pre-sales, and management roles at companies including SAS, MariaDB, Sun Microsystems, Dun and Bradstreet, and Pure Storage. He has worked with Fortune 500 companies in various industries, with deep experience in architecting and implementing Business Intelligence, Analytics, Data Management, High-Performance Computing, and AI solutions.