Imagine you’re running a bustling airport that serves passengers from all over the world. Each traveler needs to go through security, present identification, and get the right permissions to board their flight. Now, imagine if this airport had just one small security checkpoint — it would quickly get overwhelmed, causing massive delays. Instead, you’d want multiple checkpoints that are synchronized, efficient, and always available to handle the influx of travelers smoothly.
This is exactly the challenge that many growing applications face when handling user authentication. As more users sign up and log in, your authentication system must be secure, scalable, and always available. Ory Hydra is an increasingly popular solution for this purpose: It’s an open-source OAuth2 and OpenID Connect server that handles secure token issuance, authentication flows, and federated identities. It simplifies implementing industry-standard identity protocols, so developers can focus on their application’s core functionality.
In our airport analogy, Ory Hydra acts as the security checkpoint, verifying identities and granting permissions. Meanwhile, the highly resilient distributed SQL database CockroachDB ensures that these checkpoints are distributed across multiple locations, preventing bottlenecks and downtime.
This guide walks you through setting up Ory Hydra with CockroachDB, ensuring that your authentication system is not only secure but also highly available and scalable. Whether you’re a developer looking to implement authentication for a single app or an enterprise seeking a globally distributed solution, this tutorial will help you achieve your goals.
What We’ll Cover
Configuring CockroachDB as the backend storage for Ory Hydra
Setting up Ory Hydra as an OAuth 2.0 provider
Integrating the authentication system with your application
Running OAuth 2.0 authorization flows
Cleaning up after setup
By the end of this guide, you will have a fully functional OAuth 2.0 / OpenID Connect authentication system that can handle user logins, authorization flows, and token management in a secure and scalable manner.
Prerequisites
Before we start, ensure you have the following installed:
The latest version of Docker and Docker Compose
Git for cloning repositories
jq for parsing JSON responses
(Optional) Colima as an alternative to Docker Desktop (if using a Mac)
To install Colima:
brew install colima
colima start
docker ps -a
Cloning Ory Hydra
First, clone the Ory Hydra repository to your local machine:
git clone https://github.com/ory/hydra.git
cd hydra
Now open a new terminal tab for the next steps.
Running Ory Hydra with CockroachDB
Start the OAuth 2.0 server by running:
docker compose -f quickstart.yml \
   -f quickstart-cockroach.yml \
   up \
   --build

Starting hydra_cockroachd_1
Starting hydra_hydra_1
[...]
hydra/quickstart-cockroach.yml at master · ory/hydra
The most scalable and customizable OpenID Certified™ OpenID Connect and OAuth Provider on the market.
Building the image will override the Ory Hydra production image on your local registry. To download the latest production image again, run:
docker compose -f quickstart.yml pull hydra --policy alwaysCreating an OAuth 2.0 Client
To confirm that everything is working, create an OAuth 2.0 client:
client=$(docker compose -f quickstart.yml exec hydra \
   hydra create client \
   --endpoint http://127.0.0.1:4445/ \
   --format json \
   --grant-type client_credentials)

# We parse the JSON response using jq to get the client ID and client secret:
client_id=$(echo $client | jq -r '.client_id')
client_secret=$(echo $client | jq -r '.client_secret')
Extract the client ID and secret:
client_id=$(echo $client | jq -r ‘.client_id’)
client_secret=$(echo $client | jq -r ‘.client_secret’)
Performing Client Credentials Grant
Use the credentials to perform authentication:
docker compose -f quickstart.yml exec hydra \
 hydra perform client-credentials \
 --endpoint http://127.0.0.1:4444/ \
 --client-id "$client_id" \
 --client-secret "$client_secret"
ACCESS TOKEN ory_at_e_GtKSrX3FFgpVkXfWKDCupL-9sTjjKWFgymVj3sRYc.e5ZbGeAvmPhy97th6QFj1QUj8D4fbjEgM0_lhpKbdkM
REFRESH TOKEN <empty>
ID TOKEN <empty>
EXPIRY  2025-02-03 06:00:01 +0000 UTC
You should receive an access token as output.
Token Introspection
Verify the token with:
docker compose -f quickstart.yml exec hydra \
 hydra introspect token \
 --format json-pretty \
 --endpoint http://127.0.0.1:4445/ \
> ory_at_e_GtKSrX3FFgpVkXfWKDCupL-9sTjjKWFgymVj3sRYc.e5ZbGeAvmPhy97th6QFj1QUj8D4fbjEgM0_lhpKbdkM
{
 "active": true,
 "client_id": "b8e23954-b2ff-4c2f-ac6f-c5eca4417388",
 "exp": 1738562401,
 "iat": 1738558801,
 "iss": "http://127.0.0.1:4444",
 "nbf": 1738558801,
 "sub": "b8e23954-b2ff-4c2f-ac6f-c5eca4417388",
 "token_type": "Bearer",
 "token_use": "access_token"
}
Performing OAuth 2.0 Authorization Code Grant
Create a client capable of performing the authorization code flow:
code_client=$(docker compose -f quickstart.yml exec hydra \
   hydra create client \
   --endpoint http://127.0.0.1:4445 \
   --grant-type authorization_code,refresh_token \
   --response-type code,id_token \
   --format json \
   --scope openid --scope offline \
   --redirect-uri http://127.0.0.1:5555/callback)

code_client_id=$(echo $code_client | jq -r '.client_id')
code_client_secret=$(echo $code_client | jq -r '.client_secret')
Note that you need to add --token-endpoint-auth-method none if your clients are public (such as SPA apps and native apps) because the public clients can't provide client secrets.
Extract the new client ID and secret:
code_client_id=$(echo $code_client | jq -r ‘.client_id’)
code_client_secret=$(echo $code_client | jq -r ‘.client_secret’)
Running an Example Web Application
Run an example web application to demonstrate the authentication flow:
docker compose -f quickstart.yml exec hydra \
   hydra perform authorization-code \
   --client-id $code_client_id \
   --client-secret $code_client_secret \
   --endpoint http://127.0.0.1:4444/ \
   --port 5555 \
   --scope openid --scope offline

Setting up home route on http://127.0.0.1:5555/
Setting up callback listener on http://127.0.0.1:5555/callback
Press ctrl + c on Linux / Windows or cmd + c on OSX to end the process.
If your browser doesn't open automatically, navigate to:

       http://127.0.0.1:5555/

Visit http://127.0.0.1:5555/ and complete the authentication process by selecting ‘openid’ and ‘offline’ before clicking Allow Access. This will generate an access token, refresh token, and ID token.
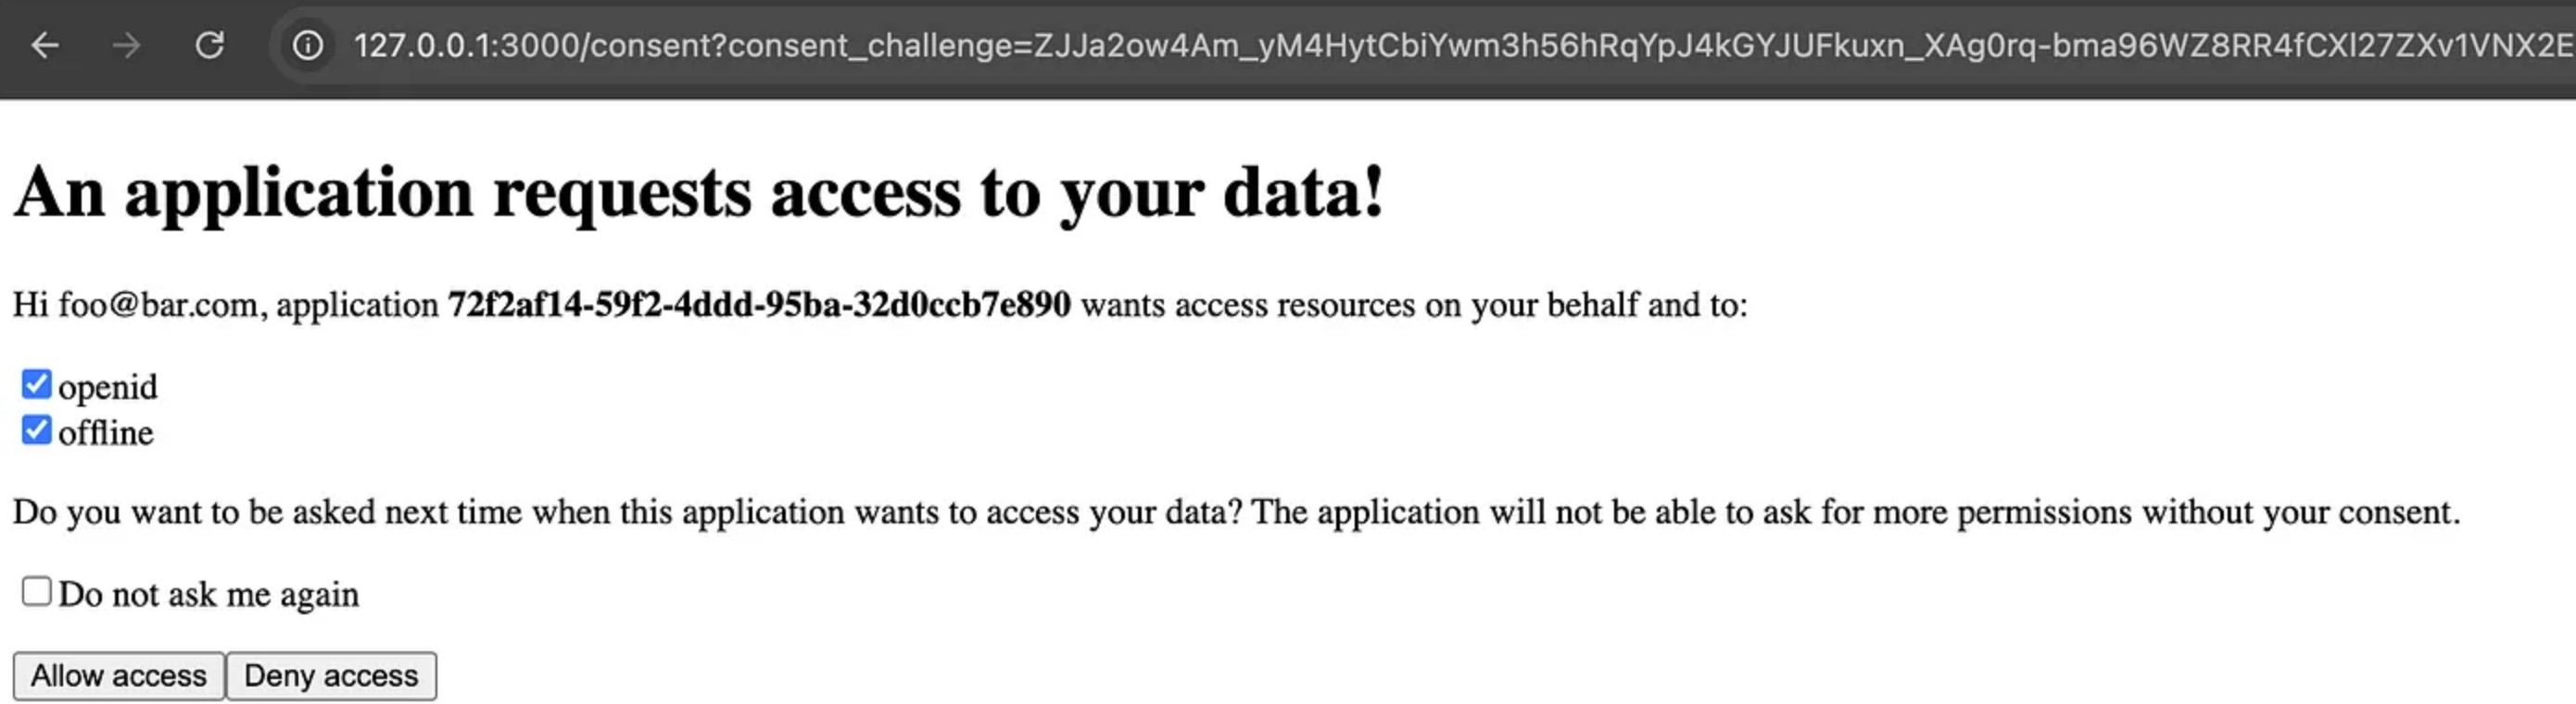
Check ‘openid’ and ‘offline’ then click Allow Access. Hydra will become notified and give you an access, refresh, and ID token.
Access Token: ory_at_HYByuJXhStb2nan_w8maFFYdnml_xBMT7aGCOldY8LM.FAZWZWZLflu78afsw83jy27NU32RuN0qi4aRKTWWer0
Refresh Token: ory_rt_h5KkR1Iq0tYuiCZlf8YgZMeZVFb36YYLn7QP49xvju0.q7XbZKxIqgjvUn0DK7CuVMloP74bKTxTkmNm4S1dHAA
Expires at: Mon, 03 Feb 2025 06:07:06 UTC
ID Token: eyJhbGciOiJSUzI1NiIsImtpZCI6IjQ2NjgxMDUxLTVlYzgtNDliZi1iYjBhLWY2NDAzNTE5ZWI5MSIsInR5cCI6IkpXVCJ9.eyJhY3IiOiIwIiwiYXRfaGFzaCI6IjczNWY0bldoWHRIaU5HaFAyYl84aEEiLCJhdWQiOlsiNzJmMmFmMTQtNTlmMi00ZGRkLTk1YmEtMzJkMGNjYjdlODkwIl0sImF1dGhfdGltZSI6MTczODU1OTIxMSwiZXhwIjoxNzM4NTYyODI3LCJpYXQiOjE3Mzg1NTkyMjcsImlzcyI6Imh0dHA6Ly8xMjcuMC4wLjE6NDQ0NCIsImp0aSI6IjMzYWM1NzFkLTJjMjAtNDAwMy1hOTQwLTA5YmQ5NDcwYzcyOSIsIm5vbmNlIjoiY3F4d3hwcnF4dnVmZndzZWtjbW5jd3phIiwicmF0IjoxNzM4NTU5MTExLCJzaWQiOiIzOGNhNmQ0Mi05OGJiLTRiOTYtYWZlZS0xZTgxZjdkODBlYTkiLCJzdWIiOiJmb29AYmFyLmNvbSJ9.DESt-vcKkJrF6SYmHQQygC5v4RJCJH5GNLGfJavg7Eek6HUyWRIXl2LbPyyZsewvyxbvf0h4byDmWTRRvus58RI6N51OaNUQpjbqK42K3moMNxHw4x7YQP3PAptMgPVLTATy4lmMImRqy-hEh_nFcyZW7WAT2jgQPGskg3veK0PSC0zZA5zMAa6j8ulHe72lD_-YUuVKBRI32GNE5XqLYS8sUQ0DnNzmdTdAMRjYrejSX7r6RYufGzvzJF4OsBVrRcpXsd2TdRJ8gATwdsI851_K4eiNxBaVRbMEeELUJnwcaTaXBWKWq_Ng0VPqi7yaBUP95NOwPWXufSRnXeX6Qx01_mC7VTE_Lvwg_07ViPcewFEocMPnzd82u4wrecQ9wBTk71zk7y8S5Shw5fpQ3nYMWIfOtylkqTFDjXoT4m6oKueDFm4ZH85-KPKo_hfBefPdOffFW01aq7XMf5iB69ufkkRN7Iu7Fg0kiXvaUt6GYZKVSyE79Jy08TrQIKomWleEBa7vPbGg9cJlBj5VsKuJkjOi5arxCUYdOqnhKS05rEJWGd8moyhRQvE8TrvaoisCmgV_sFLqvEI578bJJV9NmUJbFHcd1a05UTchTl5CR6pdb1qFvP8AeQJp19__dx3FQjx_mgKUKKXN1vhB7aqWDIXEc_dvtlDYFvFsBHY
Cleaning Up
When finished, clean up the running containers with:
docker compose -f quickstart.yml kill
docker compose -f quickstart.yml rm -f -v
Ory Hydra + CockroachDB: Highly scalable user authentication
By following this guide, you have successfully set up Ory Hydra with CockroachDB as a scalable authentication system. This setup ensures high availability, security, and resilience for your authentication needs, whether you are building a small application or an enterprise-level system.
If you need to expand this setup, consider leveraging CockroachDB’s multi-region capabilities and integrating more authentication flows for your specific use case. With this foundation, you are well on your way to deploying a reliable and future-proof authentication system – think about that the next time you head to the airport!
Ready to try this auth workflow for yourself? You can get hands-on with CockroachDB’s free cloud offering today.
Ben Sherrill is a Sales Engineer for Cockroach Labs.